Roadbooks are a tool that are commonly used in motorsports and orienteering to navigate uncertain terrain, as they consist of guidance for orientation and navigation. They usually contain several pages with diagrams, GPS coordinates, and written instructions to aid your navigation…
Digital Roadbooks contain all this information in a digital format, eliminating the need to read paper instructions… when navigating, the GPS will show all maneuvers on the screen. With them, you can have fun and enjoy the outdoors safely.
Uses of Roadbooks
The multiple advantages of using Roadbooks for navigation are:
- Orient yourself while navigating a route
- Know what maneuvers you need to perform at each moment
- See a point of interest to visit (Hermitage, fountain, scenic viewpoints…)
- Identify a hazard point or route caution
- Open images and enriched descriptions attached to a route point
Creating Roadbooks
To create a Roadbook in Land, you need a track and descriptions and images for the route points:
1- Open the track.
2- In the toolbar, click the 'Create & Edit Tracks' button:
3- Add your roadbook points by clicking the 'Add roadbook point' button in the track editor toolbar or right-clicking the track point you want to mark and selecting 'Add roadbook point'.
Another way to create your roadbook points is using the 'drag and drop' technique. Click the 'Edit roadbook' button in the track properties and you will have access to a gallery with all the icons available to create roadbooks. Select the icon you want to use, drag and drop it onto the exact point on the track you want to mark. Repeat this for each roadbook point you want to create.
4- A window will open to enter the basic information for the point you are creating:
5- Then move the roadbook point and click on the track point where you want to place it:

6- Repeat this for each Roadbook point you want to highlight.

7- Save the resulting file in *.TRK format, and your Roadbook is created.
Editing Roadbooks
Follow these steps to edit a Roadbook file and enhance it:
1- Open the roadbook track (*.TRK format).
2- Once open, access its contextual menu and select 'Edit > Edit Roadbook':
You will see a new window (roadbook editor) with all the track points:
3- From this window, you can edit the Roadbook points with relevant information:
- Sketch: Attach an image showing a sign or guidance for easy orientation.
- Description: Write important maneuvers, information about a point of interest…
- Attached files: Attach a file (voice instruction audio, an image…). You can attach them from the 'Associations' box or using the 'Attach files' button.
- Enriched description: Add a more detailed text description about a roadbook point with embedded images. On the right side of the 'Roadbook Editor' window, there is a button to create it, opening a new window for the enriched description. You can also access enriched description creation from the context menu of the selected roadbook point 'Associations' (from the Data Tree or directly on the Map).

4- Repeat this for each Roadbook point you want to highlight.
5- Save the resulting file in *.TRK format to have your edited Roadbook.
6- If you want all attached files to be saved embedded in the same file, save it in *.BTRK format, making it easier to share with others.
Important: Do not delete the Roadbook file in *.TRK format; always keep it since the *.BTRK file cannot be edited. If you want to make changes later, you must open and modify the *.TRK file and then save it again in *.BTRK format.
Roadbook Navigation
To navigate a Roadbook using the TwoNav App or a TwoNav GPS, go to the menu 'Start > Follow a Route' and select the track of the Roadbook you want to navigate:
The 'Activity Preview' window will appear, and you must click 'Go' to start navigating:


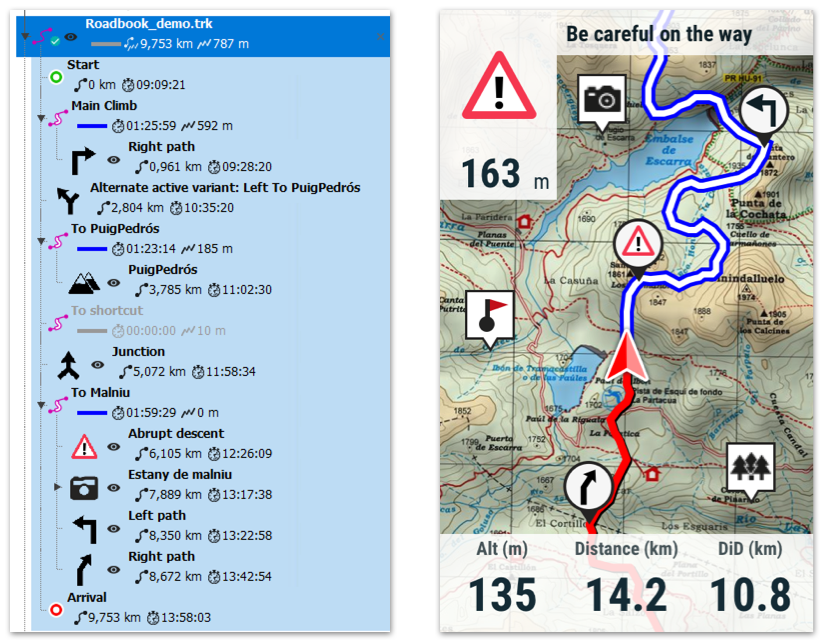
While navigating, the top-left corner will show the icon of the next Roadbook point you are approaching and the distance to it:
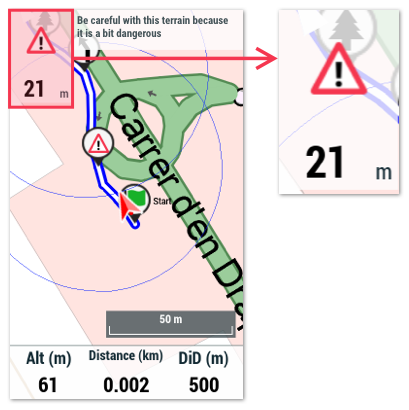
If that Roadbook point has a description, it will appear at the top. If it has an attached audio file, it will play when you approach, and if it has an image or an enriched description, a new window will open to display them:
Once you pass that Roadbook point, the next one will appear, and so on until reaching the end of your route.

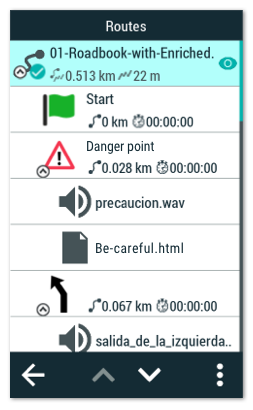
Note: From the Routes list, you can see all the points of your Roadbook and access the attached files and enriched descriptions you created:
Comments
0 comments
Article is closed for comments.